
Where Is Here: New Home
How to make your Unity Editor Tab Scene smoother while working on your game
Hey guys!!
1) Remove all MESH COLLIDERS in your game objects
2) DON'T select a game object while moving around in tab scene zhen it's far away (PRESS key "F" while on tab Scene to quickly get to your game object)
3) Deactivate in tab Scene "fog"
4) Select which quality level you want for your game to look and depending on your PC graphic power card
5) If you have another GPU instead of Intel, use it! (I have Nvidia)
1) REMOVE ALL MESH COLLIDERS IN YOUR GAME OBJECTS
If you have lots of game objects with mesh colliders close to each other, you will have lots of lags. Unity editor calculates every time when a mesh collider is on a game object, that's why people don't use them too much in games. Change them in BOX, SPHERE or CAPSULE colliders.
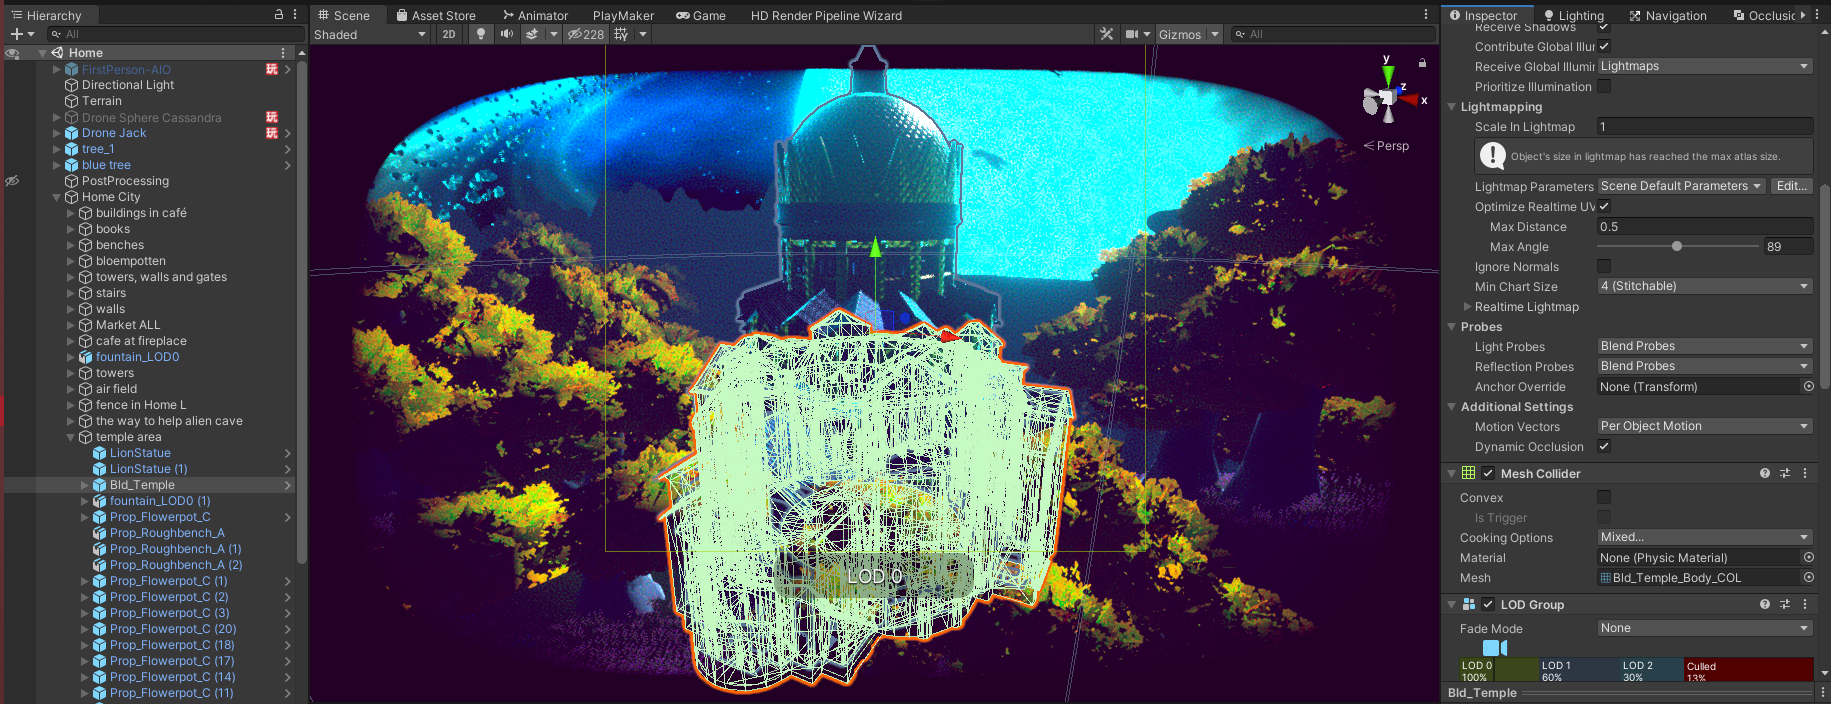
Example image of mesh colliders in a building called temple. Too many mesh colliders will lag your game while selecting it.
2) DON'T SELECT A GAME OBJECT WHILE MOVING AROUND IN TAB SCENE IN UNITY EDITOR
This is a common mistake to all newbies of moving around the game scene while selecting a game object. IF the game object that you have selected is with mesh collider, you will lag the hole time while moving around in the scene.
If you want to go to a specific game object, go to "HIERARCHY - SELECT THE GAME OBJECT YOU WANT TO SEE UP CLOSE - PRESS KEY F ON YOUR KEYBOARD WHILE ON TAB SCENE IN UNITY EDITOR.
This is the fastest way to reach to your game object without moving your camera to it.
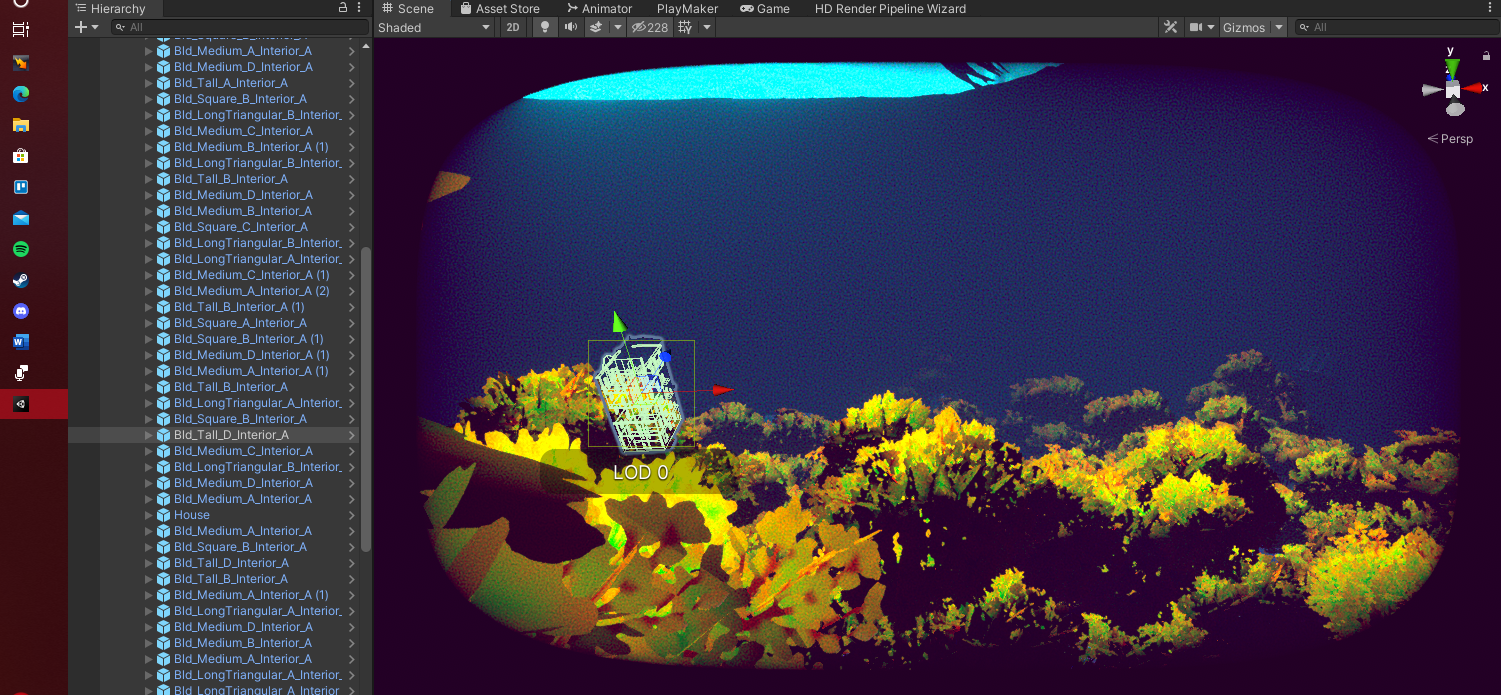
Example image of a building in the city with mesh colliders. You should press key F on your keyboard to see up close fast instead of flying to it. Your PC will lag a lot! IF you select the game object with lots of mesh colliders and move towards it with your camera, it will lag a lot!
3) DEACTIVATE IN TAB SCENE IN UNITY EDITOR "FOG"
When fog is activated in your scene and game tab, your game will be laggy the hole time. Deactivate your fog so you can move smoothly in the tab scene.
You can also deactivate "Animated materials", these are the game objects that moves with animations. Some game objects moves while you are moving in the tab scene. IF your PC still lags, deactivate it.
I didn't deactivate it because I don't need to.
WARNING!!
When you deactivate your fog in your game like this. The fog will NOT be gone in your game. It's just invisible!
BUT.. You need to lightmap your scene so the fog will exist in your build. Otherwise the fog won't be there and your lights won't be correct too.
Here is the LINK devlog I made about lights and lightmapping during my 1 week crunch time learned about performaces.
LINK: All performances techniques I learned during 1 week crunch time in August 2021 in Unity 3D - Where Is Here: New Home by Roxanna Stefaniuc Fabiola (itch.io)

Example image of showing where to deactivate fog and animated materials in Unity Editor.
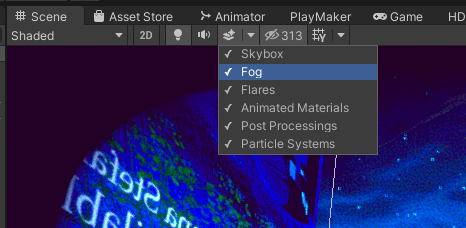
Example image of showing you where to deactivate fog.
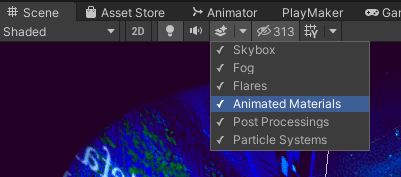
Example image of showing you where to deactivate Animated Materials.
4) SELECT WHICH QUALITY LEVEL YOU WANT FOR YOUR GAME TO LOOK GOOD AND DEPENDING ON YOUR PC GRAPHIC POWER CARD
This quality was on high and my graphic cards couldn't keep up with high quality of my game. It became so laggy I had to put on medium.
And I am very happy with medium.
You should try it too.
Go to EDIT - PROJECT SETTINGS - QUALITY.
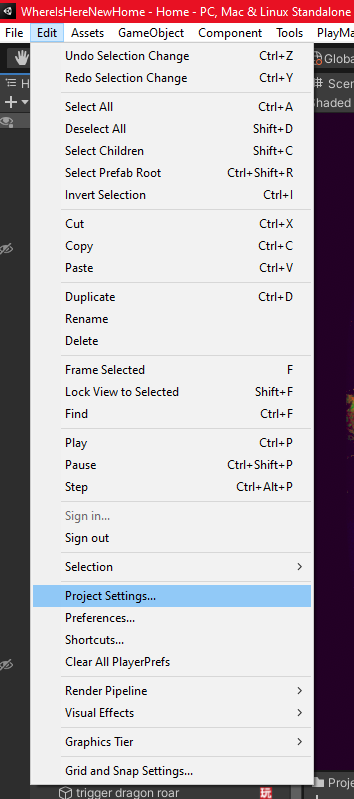
Example image of where the project settings is in Unity Editor.

Example image of the option quality. Mine is medium.
5) IF YOU HAVE ANOTHER GPU INSTEAD OF INTEL, USE IT! ( I HAVE NVIDIA GEFORCE GTX)
Unity Editor was using INTEL GPU and the program was very slow. So I learned something to put Unity Editor on Nvidia GPU and it went faster with lo lags or waiting time.
Let me show you step by step how I did it IF you have Nvidia graphic card in your PC or laptop.
Go to your Nvidia Control panel
- Start - Type in search bar - nvidia control panel and click it
OR
- Go to your shortcut icons at the bottom of your screen and right click with your mouse on the eye icon of Nvidia - Nvidia settings - select control panel
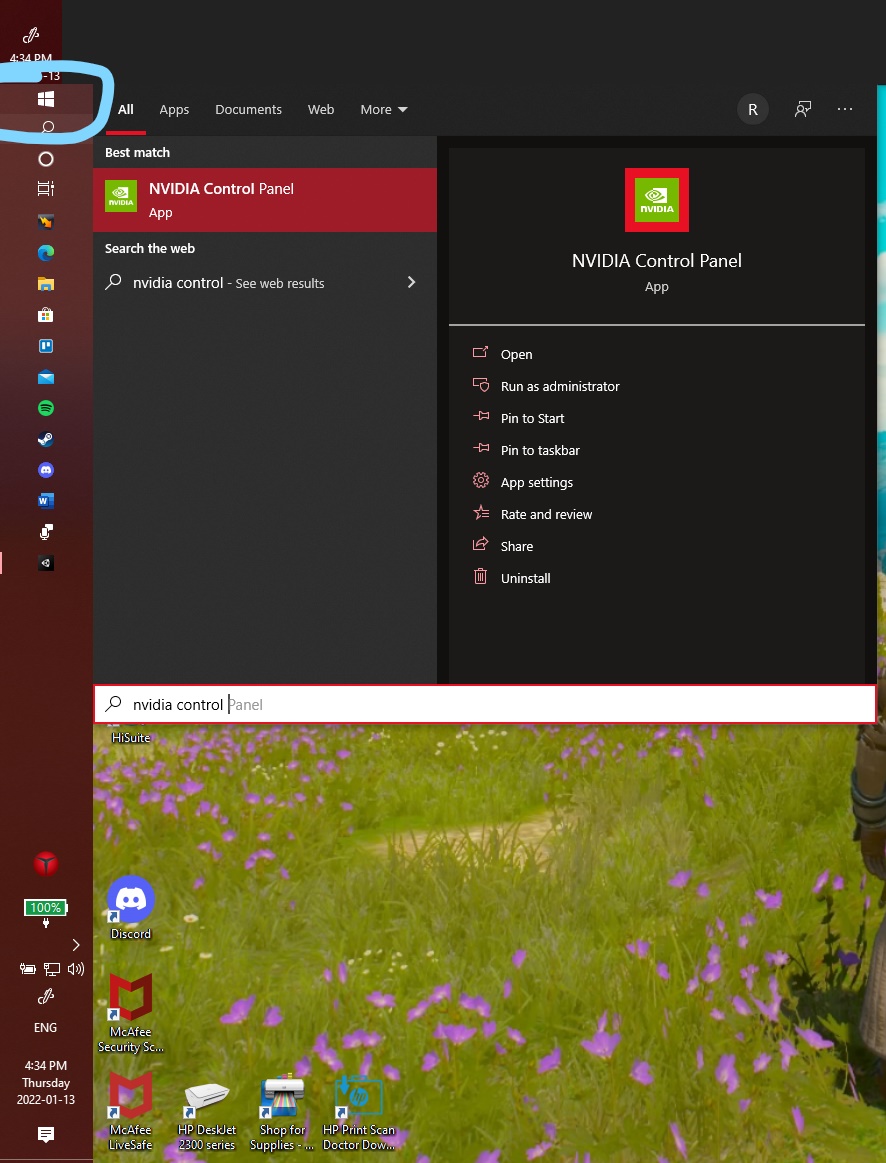
Example image of start Windows and type in the search bar control panel Nvidia.
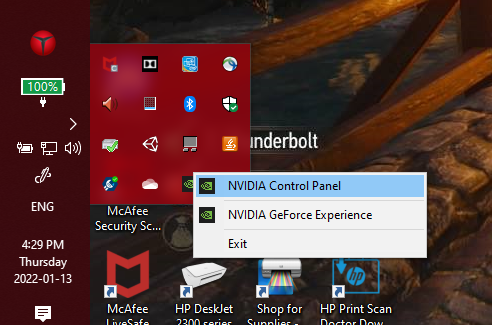
Example image of searching icon of Nvidia and click on control panel.
You will see this. On tab "Global Settigs" set your preferred graphics processor to "HIGH PERFORMANCE NVIDIA PROCESSOR.
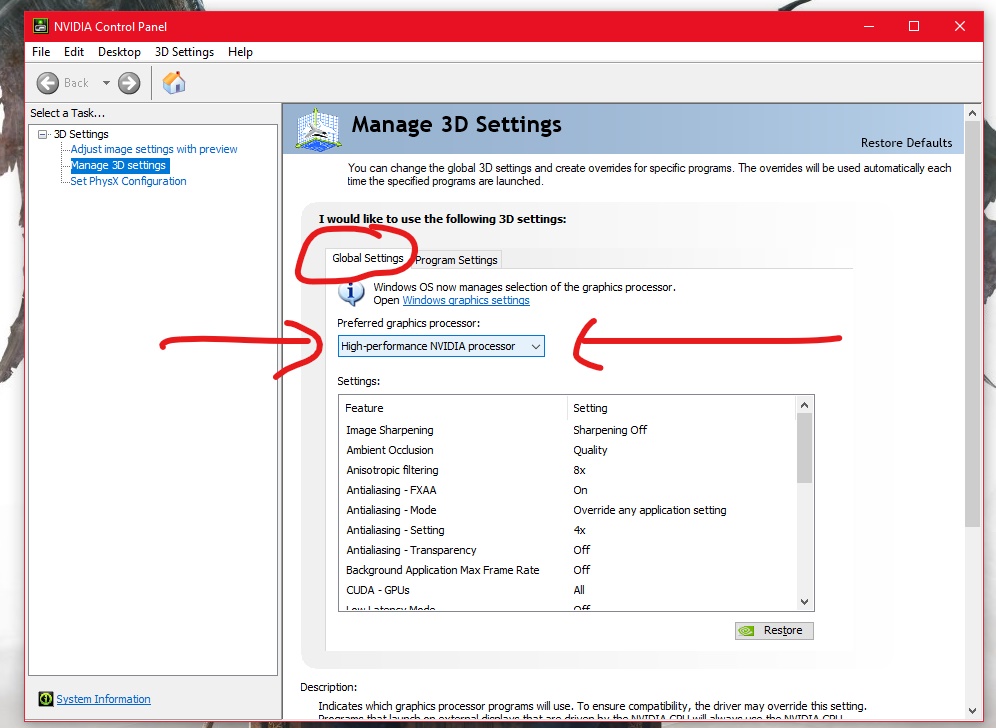
Example image of opening the Nvidia Control Panel in Windows 10.
Go to tab "Program Settings" and go to add. You need to find Unity. See next step.
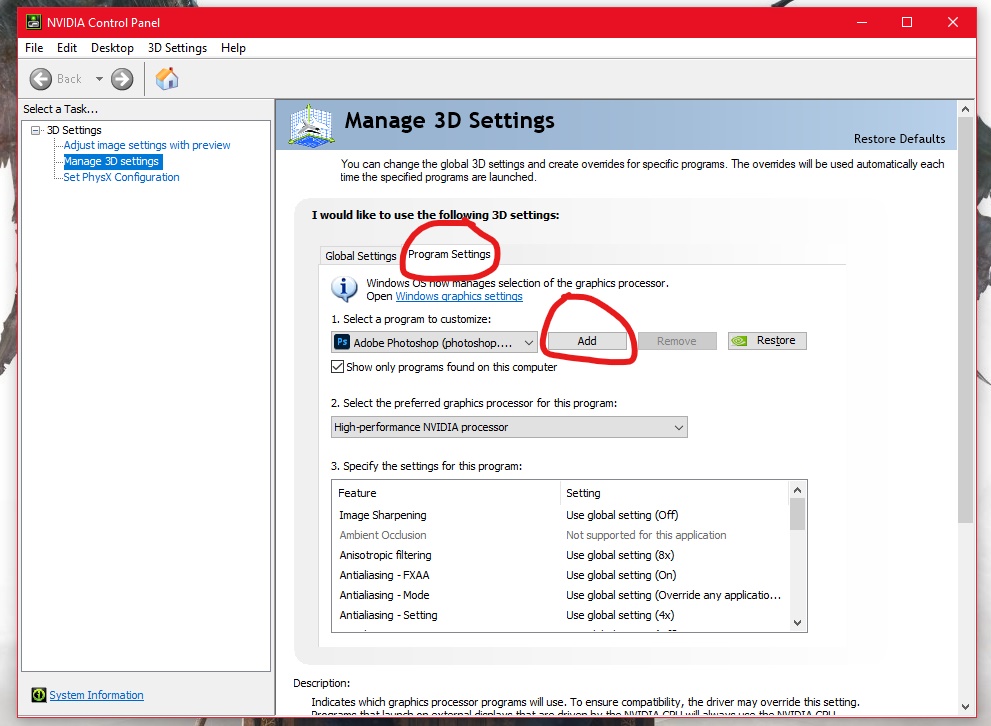
Example image of tab Program Settings in Nvidia control panel in Windows 10.
Find "Unity.exe" and select it!
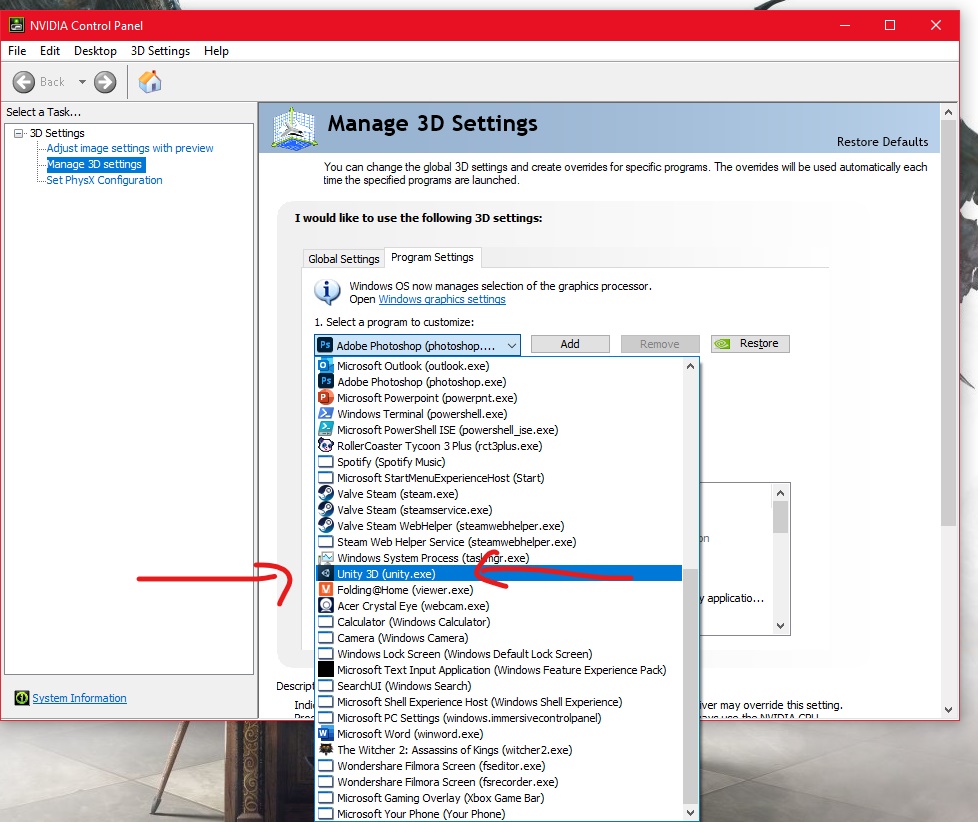
Example image of selecting (adding) Unity.exe in program settings tab in Nvidia Control panel.
Check if you select these:
1. Select a program to customize: UNITY.EXE
2. Select the preffered graphics processor for this program HIGH-PERFORMANCE NVIDIA PROCESSOR

Example image of Program settings for Unity.exe.
Why 2. High performance Nvidia processor?
Because it will work better and faster if you select that.
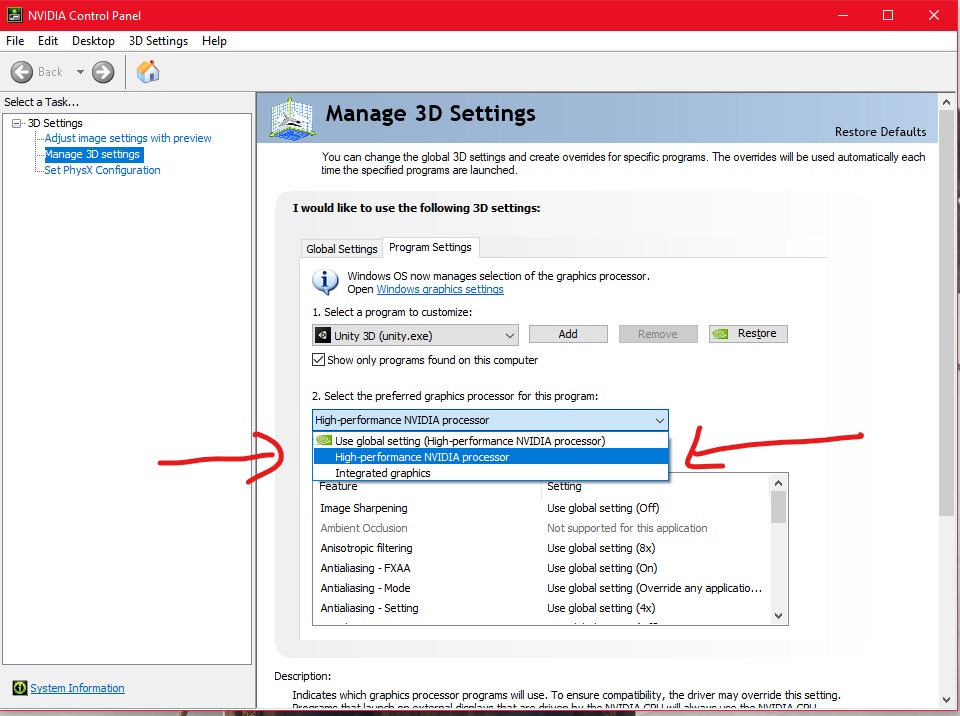
Example image of selecting High performance processor at number 2.
At number 3. Specify the settings for this program:
- FInd "Max Frame Rate" to 500 FPS and click OK.
I don't remember the standard of my FPS but I changed it to 500. And it works good.

Example image of changing max frame rate to 500 FPS for Unity.exe
When you are finished with these steps, close the window and go to settings in Windows.
- In settings you will find a search bar - Type "Graphics Settings"
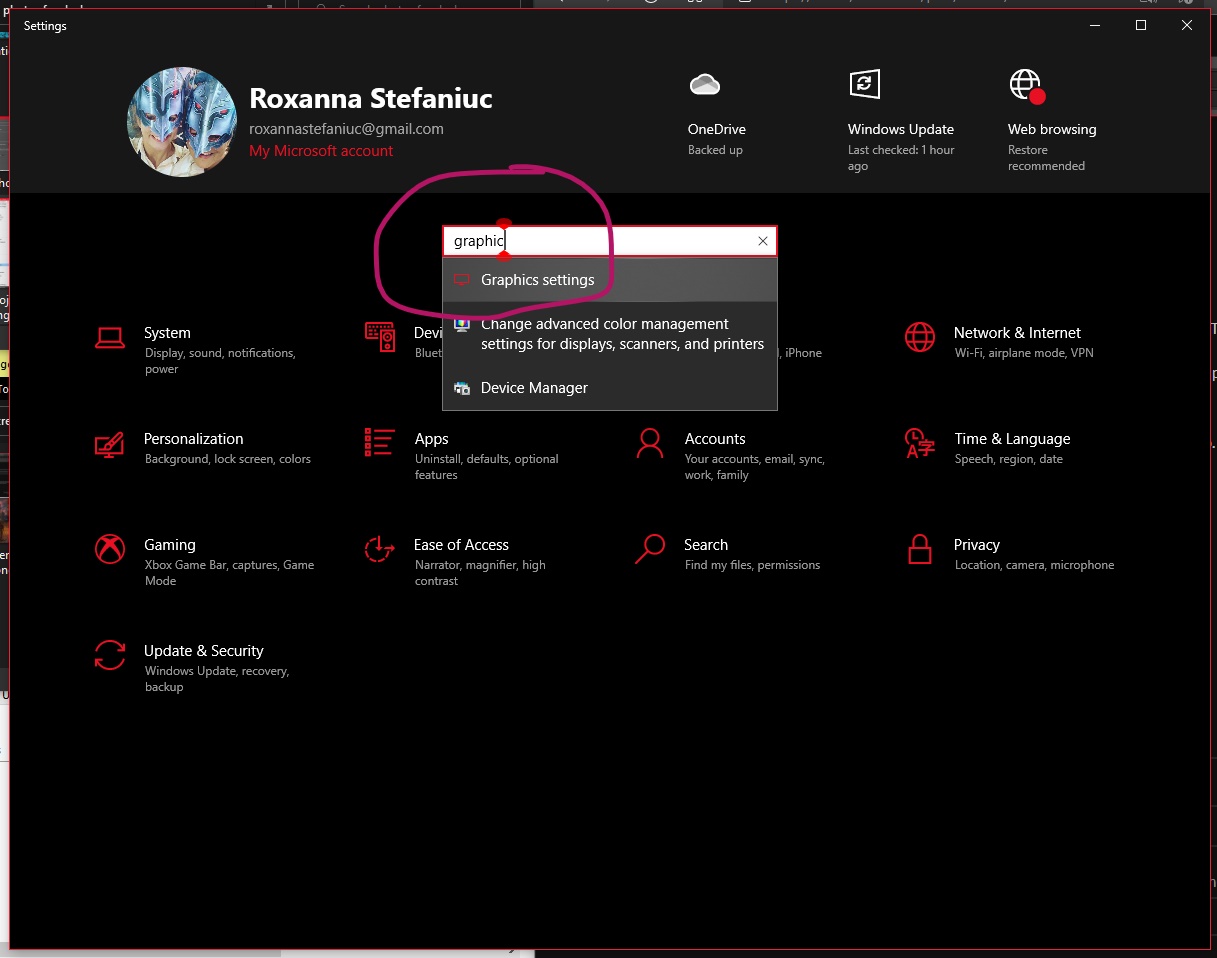
Example image of Settings in Windows 10.
At Graphics Settings you will see this. Go to browser and click it.
(I already have it under browser, just ignore it. After these steps, you will have it too).

Example image of Graphics Settings of Windows 10.
Go find the folder "Unity VERSION XX" in programs and double click it.
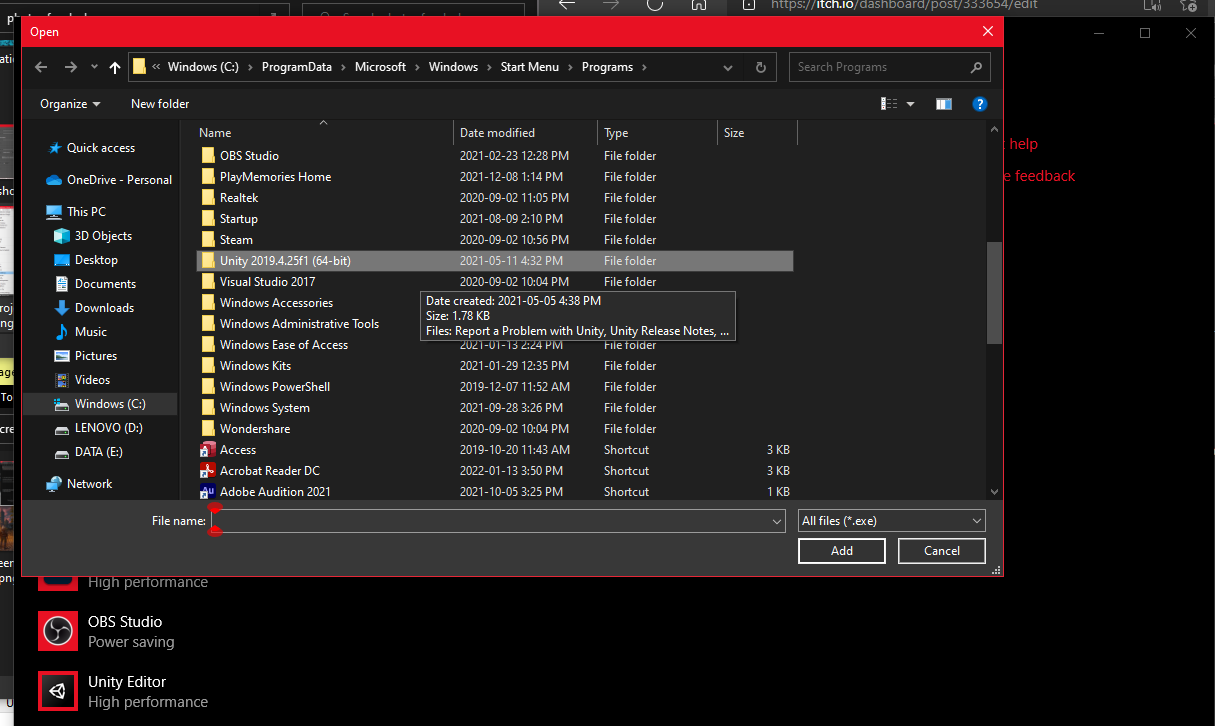
Example image of folder in Progams.
You have to find that Unity Icon and ADD it.
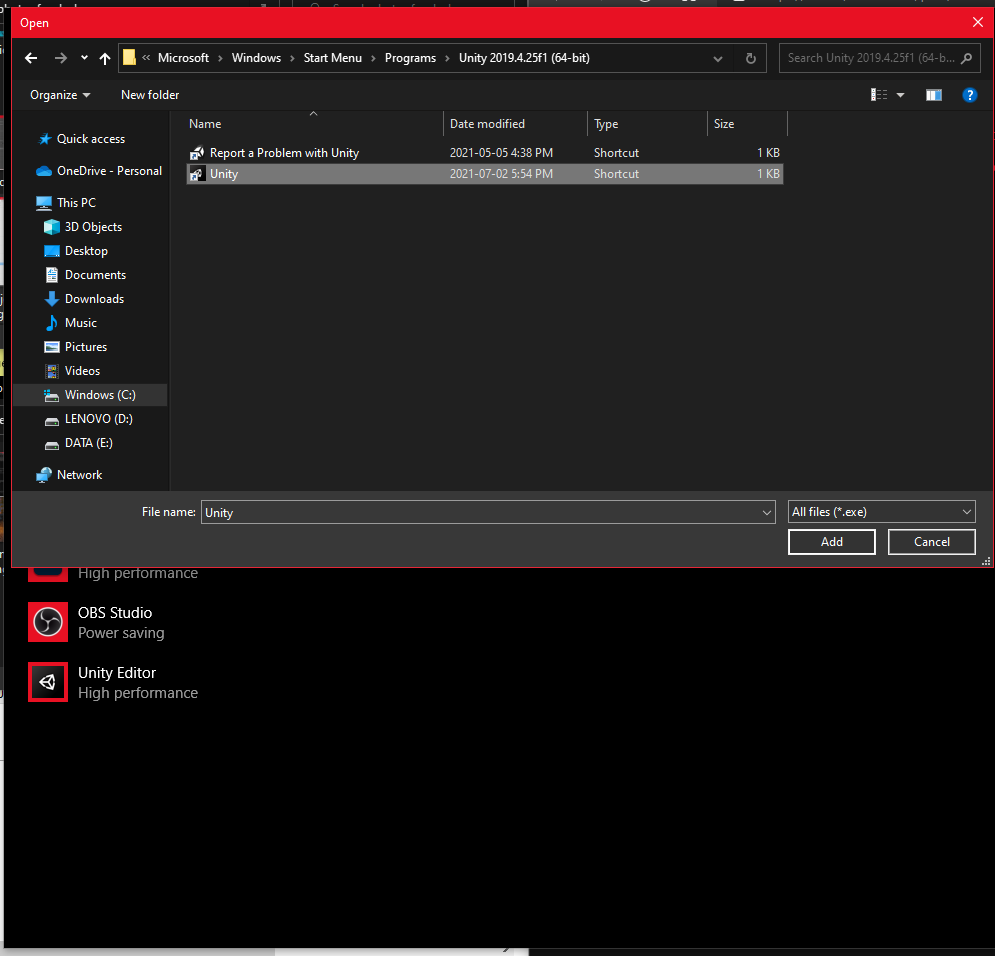
Example image of selecting Unity to add.
You will have Unity Editor so you need to click it.
The options and remove will appear if you click it. So click on Options.
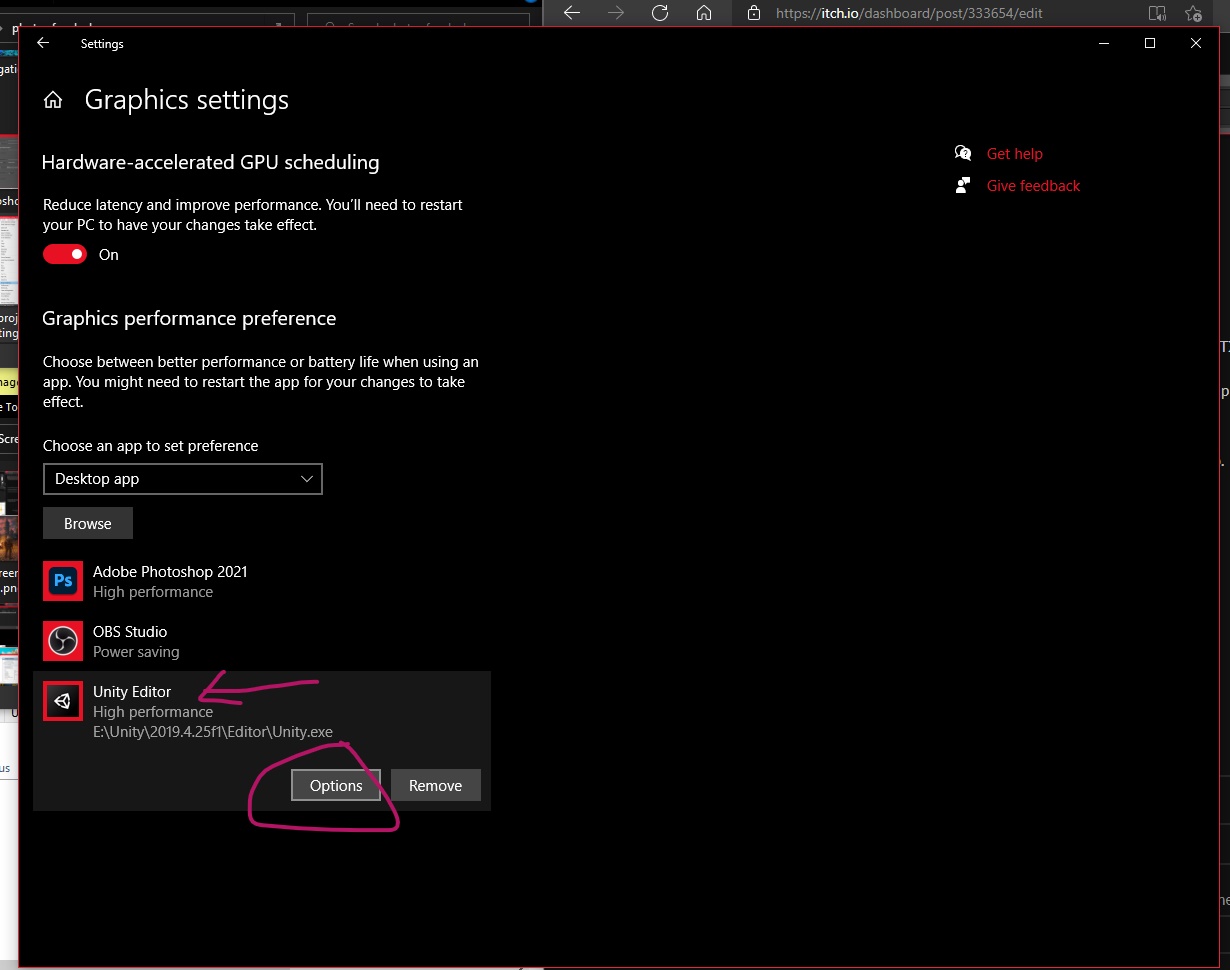
Example image of Unity Editor with options and remove choices.
This will appear IF you chose "Options" and you need to click HIGH PERFORMANCE (GPU NVIDIA) and after you click your other graphic card instead of INTEL. Click on "Save".
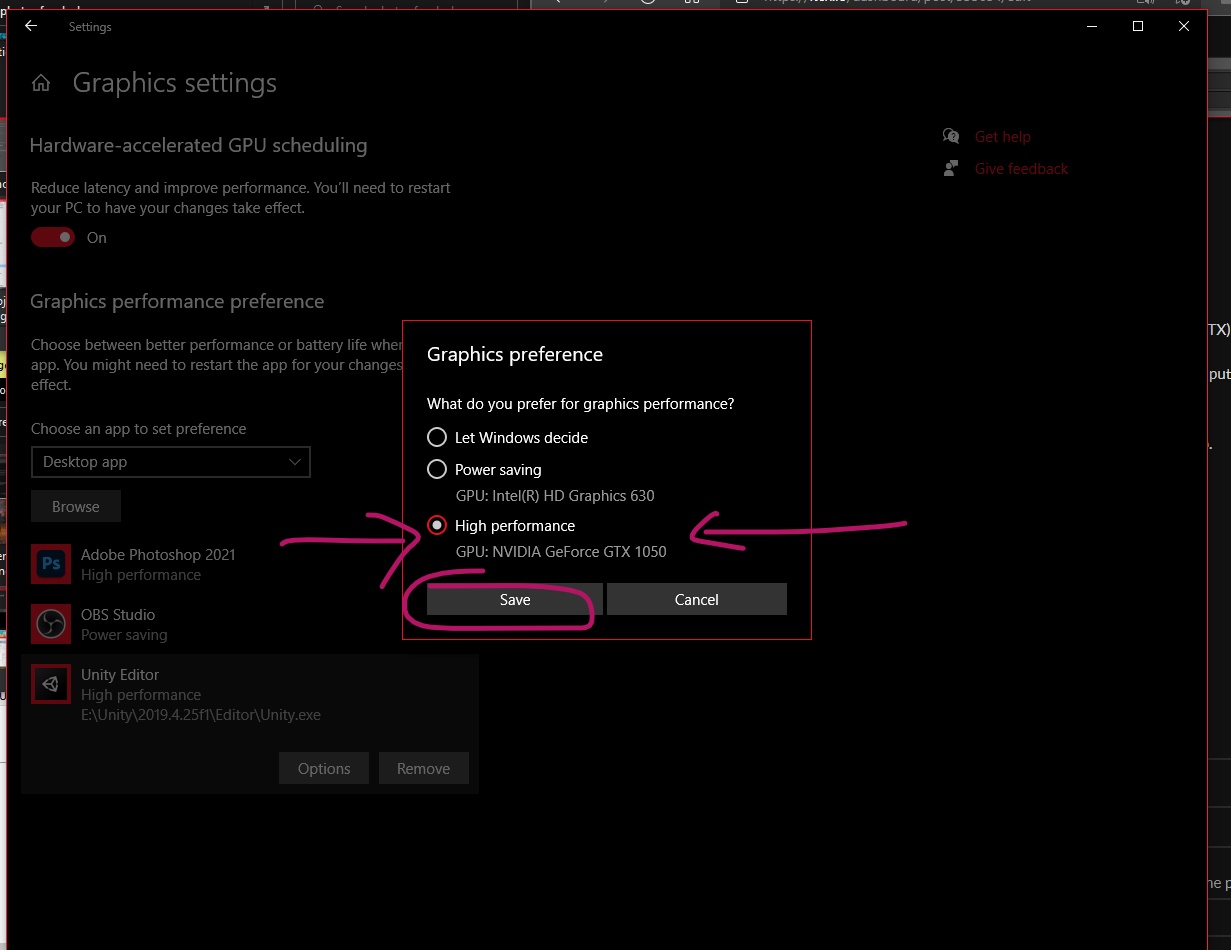
Example image of selecting high performance on Nvidia GPU.
And voila! You have your Unity Editor working with your OTHER graphic card (Nvidia) instead of INTEL.
TIP:
My Unity Editor is on my E drive so try to save your Unity on another drive because it takes a lot of space! Especially your projects!
That's it!
Normally your scene will be smooth and easy to work in Unity Editor.
Good Luck!
Comments
Log in with itch.io to leave a comment.
Very interesting!
I am glad you like it :D